Finally getting some progress up with the Biel Tan army. And it's a nice big jump in completed model count with 40 troops done.

This is a very late post in that everything here was painted and photographed in late 2020 but I'm only adding a writeup in late 2021. Several small things, including having had to copy all my 2020 mobile phone photos onto an external hard drive that I promptly misplaced... and so I put off any more recent posts as well. Anyway - when I last added a post, I had 40 guardians on sticks that were not going well in the painting stage. Before doing a mass airbrush run, I had done a few test models (ie...2) but it was the batch painting that uncovered a few more challenges and resulted in some changes to what will (hopefully) be the quick and easy process for doing any other Eldar in the future.
I had done about 20 models that just weren't working... they went into simple green, and after stripping all the paint off, we're onto method 2.0...
- Black primer
- Caliban green (air) over ~90%
- Warpstone glow (with 50% airbrush thinner) at about 45deg
- Moot green (air) over upper surfaces (plus toes, knees...)
Trying something different to my marines - I got a box of painting sticks with alligator clips which I figured would save a lot of time on pinning. Clip onto a leg, prime everything else then switch the clip onto the catapult... tiny bit more primer, then all the greens. Only one switch of clip needed, and much faster than my usual blobs of blutac that can take a while to pick off.
Turns out moving the clips around isn't a great option - the rubber caps on the clips immediately stuck to the black primer and then pulled paint off when removed. There are some really obvious pulls below where the grey plastic is visible.
Bugger. So new lesson learned - either be prepared to patch up an area with primer by brush later on... or I need to put at least 1 pin into a leg so it doesn't matter. Slapping primer on for this batch was fairly quick... then everything gets a good solid wash of biel-tan green to define the plates.
With the wash done, and since I am skipping edge highlighting (probably the biggest time sink...), that's basically it for the green leaving just weapons & fine details to go. One of the other 'time saving' steps I wanted to try was to glue them to bases as soon as early as possible in the process. I usually leave my blood angels off until virtually the end; blood angels have a lot of robes/decorations on the legs, and it's often cleaner to be able to get to those while the base is off. The guardians it's really just the little tabs or gems on the calves which are easy to access.
I thought a good way to pose the models on the resin scenic bases would be to use a little dab of blu tac, push the legs in where I want to show where the hole in the foot lines up (the nub in the pic below) and then drill a hole exactly there.
I then put a small pin into the other leg and twist the model like using a set of dividers/compass to mark the second hole.
Unfortunately the blu tac added another problem - on several bases, the blu tac ball pulled a flake of paint off the bases, which then needed to be reprimed, dry brushed and cleaned up...
So - next lesson learned... just stick a paperclip pin in and mark the holes. Skip the blutac.
With the bases attached, they are already starting to look the business. Sure edge highlighting would make these pop, but an extra 4-6hrs working through 40 models on that single step I am happy to skip.
This turned out to be a good quick step on the test models and it's time to try it at scale - black templar is a nice fluid black (as a contrast paint) and I figured it would be quicker to slap it all over the weapons and use as a base for gemstones or details. Because it is a contrast paint, any moot green underneath that shows through gives a hint of a highlight with zero effort. I'm planning on skipping edge highlighting the shuriken catapults too - yes...
Sure - they don't have an 'Eavy Metal polish, but these are coming up to speed very quickly even just by adding the black.
Leadbelcher details took a bit longer - it's still not heaps; just weapon details and the buttons on the little 'tabs' that all Eldar have.
There are multiple ribbons/strips of cloth that are done with grey seer and apothecary white; followed by a tiny white scar highlight.
I was also wanting to add squad markings to block out each squad of 10. These are done with slightly thinned corax white rather than paints like white scar as the coverage is better - in turn meaning I don't need to go over the lines several times to get a clear stripe.
I thought about doing parallel stripes numbered with each squad - however with 4 squads, 4 stripes was going to be too much. Instead, I opted for either 1 or 2 stripes on the chest and 1 or 2 stripes on the vanes. That will give me 4 combinations for each squad of 10, with the added bonus of being able to run them as 2 squads of 20 each with a common motif.
Up close, the stripes are a little janky in places...
However at a bit of distance & scale... the effect is pretty good. This is platoon 2 (2 lines on the back vanes), squad 1 (single line on chest) below.
I didn't take as many progress shots of gemstones - this is just mephiston red (air, to make it easier to fade) the lower half, a line of evil sunz scarlet and a line of troll slayer orange.
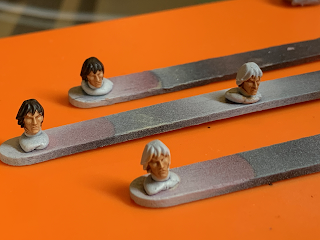
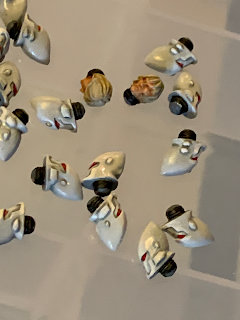
The heads were very simple - grey primer, lots of dead white through the airbrush and then a gloss varnish.
I rushed the details on these - apothecary white carefully applied as a fine brush, a couple of fine details with vallejo old gold and then vallejo red ink into the eye sockets. The red is... a bit shit - the eyes are smaller than on marines and there is zero highlighting so they aren't great. Enough though for bulk painting.
The fun extras was the 'visor' helmets for some of the gunners - these were quite a bit of fun to do in blues. A similar effect was added to the arm-screen panels that some of the guardians have.
I did a very quick and dirty set of unhelmeted heads - this is just building up a light flesh tone (kislev I think), with a thin reikland fleshshade wash. Touch up with kislev flesh and call it a day. Then an assortment of random colours for hair.
Annoying but necessary going around with abbadon black to add rubber neck detail and... we're good to go.
Starting to get a sense of how these might look as a full army - took a few final shots before bolting the heads on.
Woot. First time in 23 years to finish a squad of guardians.
One final stage I've wanted to do for quite some time is add tufts - all of my marines are set in a ruined city style and I have had several packs of gamers grass sitting unused for a good while.
Much fun was had going around adding lots of little tiny 2-5mm tufts of various colours.
And there we go - suddenly I'm 40 troops finished in a new army. I think the scheme is pretty effective and very quick compared to my marines. Also feel like it's great to get the core/basic troops hammered out at the start, so everything from here on will be adding more unique squads/colours/flair.
There are already a bunch of Wraithguard on the cards and a much more complicated set of weapon options up next.


No comments:
Post a Comment